A stitched logo and a printed logo can use the same artwork yet create completely different shopping bags. Embroidery adds thread, relief and a crafted surface. Printing places ink, dye or a transferred image on or into the fabric, which can preserve finer detail and cover a much larger area. The right decision depends on more than which sample looks premium in a photograph.
This guide compares Embroidery vs Printing for Fabric Shopping Bags at production level: artwork translation, fabric stability, stitch or colour count, backing, print chemistry, placement, setup, unit cost, sampling and bulk quality control. It does not repeat the full process catalogue in the custom shopping-bag printing guide; instead, it explains when embroidery, printing or a hybrid combination is the better branding architecture for cotton, canvas and other fabric carriers.
Explore fabric-compatible constructions on LUCKYSTAR’s shopping-bag product page. For category purchasing, refer to this manufacturer selection article; for wider supplier qualification, use the custom bag factory evaluation guide.
Planning an order? Send an embroidery-versus-print brief. Include fabric composition/weight/finish and bag construction, artwork and allowed simplification, decoration width/height and coordinates, stitch/thread/backing or print/ink/white/cure route, quantity by design, reverse-side appearance, hoop/print access, intended use/care, samples, tests, packing, destination and required date.
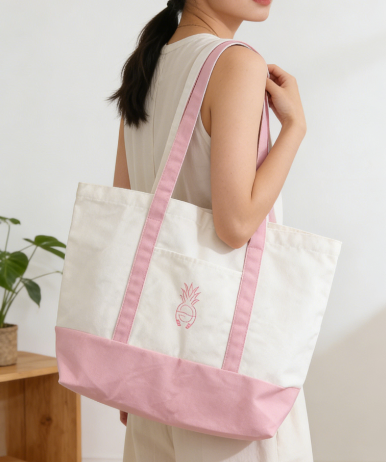
A real LUCKYSTAR cotton/canvas shopping bag with a small embroidered motif, shown on the company’s Made-in-China product page. The image demonstrates the dimensional thread effect and the relationship between the motif, handles and contrast base.
1. The fastest decision is based on artwork and desired surface
| Decision factor | Embroidery | Printing | Hybrid |
|---|---|---|---|
| Visual character | Dimensional, textile, crafted and badge-like | Flat to low-profile; graphic, photographic or illustrative | Printed story with a tactile focal mark |
| Best artwork | Simplified logo, monogram, short lettering, crest or icon | Fine line art, gradients, many colours, large type and imagery | Large print plus small premium emblem |
| Coverage | Usually compact due to stitch time, weight and fabric distortion | From a small mark to full-panel or all-over coverage | Separate print and embroidery zones |
| Main setup | Digitizing, thread plan, hoop/frame, backing and machine sample | Prepress/separations, screen/plate/transfer or digital setup and curing | Both files plus an operation order and registration plan |
| Main cost driver | Stitch count, colour changes, size, backing and machine time | Print method, colour/station count, area, white layer, tooling and run length | Two setups, extra handling and positioning |
| Critical failure | Puckering, thread break, gaps, buried detail or backing show-through | Poor adhesion/cure, colour shift, cracking, migration or weak detail | Misalignment, incompatible heat/order or excess stiffness |
Do not choose from a catalogue thumbnail alone. Ask what should be felt, what must remain legible, how large the decoration is, how the bag will be carried and cleaned, and how many units are needed per artwork. Those answers narrow the route quickly.
2. Embroidery turns artwork into stitches, not coloured pixels
An embroidery machine does not sew a PDF directly. The logo is digitized into stitch objects with stitch type, direction, sequence, density, underlay, trims and colour changes. Satin columns can create smooth borders or lettering; fill stitches cover broader shapes; running stitches can describe fine open lines. The digitizer adapts the mark to the fabric and target size.
A detailed logo may need simplification. Tiny counters can close, narrow gaps can disappear and thin outlines can become uneven when translated to thread. Enlarging the design increases stitches and weight; reducing it may require removing detail. Approve the actual sewn sample rather than a thread-colour rendering.
Thread sheen and stitch direction change with viewing angle. This is often the appeal: a simple one-colour logo can look richer than a flat one-colour print. It also means a colour match should be judged from the nominated thread on the real bag fabric under agreed lighting, not only from a monitor.
3. Printing preserves more graphic information
Printing can reproduce flat solids, small type, line illustration, gradients and photographic content, depending on the selected process and fabric. Screen printing is often efficient for one or a few bold colours. Transfer and qualified digital routes can handle complex multicolour artwork or smaller runs. A printed fabric, however, still needs a compatible ink or transfer system, correct pretreatment where required, controlled curing and an approved hand.
The company’s current product listings show LUCKYSTAR offering screen printing, digital printing, heat transfer, sublimation and logo embroidery among its decoration options. That range is useful because the bag and artwork can be reviewed together instead of forcing every design into one process. The correct option remains project-specific.
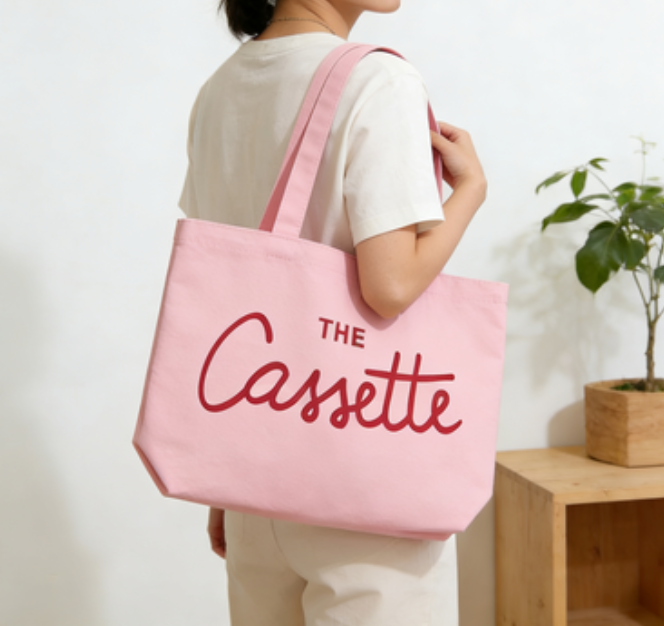
A real printed fabric shopping bag image from LUCKYSTAR’s Alibaba storefront. The large, smooth lettering demonstrates the low-profile result of printing compared with a stitched emblem.
4. Compare visual scale, detail and colour structure
| Artwork feature | Embroidery response | Printing response | Buyer decision |
|---|---|---|---|
| Short wordmark | Strong when letter shapes and spacing remain sewable | Handles finer type and wider scale range | Choose thread texture or maximum legibility |
| Small emblem | Premium if simplified and digitized for size | Can retain thin lines and tiny negative space | Sew both original and simplified trials |
| Gradient / photograph | Must be reinterpreted with thread blends or reduced colours | Natural fit for a qualified process/digital route | Print unless reinterpretation is intentional |
| Large solid field | Heavy, slow and more likely to distort the panel | More practical, subject to ink deposit and hand | Print or use appliqué plus embroidery |
| Metallic / high-sheen accent | Specialty thread can create a textile glint | May require specialty ink, foil or another finish | Compare appearance, bend and care |
| Many colours | More thread changes, trims and registration risk | Process/digital route can reproduce many hues efficiently | Price the real colour/station or thread plan |
For print colour architecture, consult Pantone vs CMYK for Custom Shopping Bags. Embroidery uses physical thread ranges rather than printed ink formulas, so an approved thread card and sewn sample should become its colour evidence.
5. Fabric stability often decides whether embroidery is comfortable
Stable, tightly woven canvas usually supports embroidery more easily than thin, stretchy or loosely structured fabric. A lightweight cotton panel can pucker under dense stitches. A coated or water-resistant fabric may be punctured by needles, and a backing or finishing layer may remain visible inside an unlined bag. A very coarse jute surface can interfere with small details.
Backing stabilizes fabric during stitching and helps control distortion. Madeira USA’s backing guide notes that fabric type is the primary selection factor and that stitch length, design density and design size also affect backing weight. Its fabric guide identifies tighter canvas/duck cloth as a stable woven platform while still recommending backing appropriate to design size and density. Treat such charts as a starting point; test the actual bag material.
| Fabric / construction | Embroidery assessment | Printing assessment | Sample focus |
|---|---|---|---|
| Heavy cotton canvas | Generally stable; supports a broad range of open-to-moderate designs | Screen, transfer or digital options depend on finish and artwork | Needle holes, puckering, ink penetration and hand |
| Light cotton | Use lighter/open design and suitable stabilization | Often better for large low-weight graphics | Show-through, distortion, shrinkage and cure |
| Coarse jute / textured weave | Bold motifs may work; fine details can sink or wander | Surface roughness limits fine print and even ink deposit | Topping/backing, edge clarity and abrasion |
| Polyester / nylon fabric | Check needle heat, backing, coating damage and puckering | Use a compatible ink/transfer system; assess dye migration | Colour bleed, adhesion, heat response and water resistance |
| Non-woven fabric | Dense stitching may perforate or tear lighter grades | Usually the more scalable branding route | Tear at needle holes, weld zone and print adhesion |
| Lined bag | Embroidery can be hidden behind lining if operation order is planned | Panel printing before assembly can protect a clean interior | Operation sequence and reverse-side finish |
6. Backing and reverse-side appearance belong in the product specification
Tear-away, cut-away, no-show, adhesive and other backing families behave differently. The choice depends on fabric stability, design density, size, bag interior, care and desired hand. A cut-away stabilizer may continue supporting the design after production but can remain visible inside an unlined tote. A tear-away can leave a neater visible interior but may not provide the same ongoing support on an unstable fabric.
Madeira USA’s backing overview lists fabric stability, stitch density, material colour, stitch length, stitch speed, design size and laundering among the variables to consider. For retail products, ask for a finished reverse-side photo and physical sample. If the inside is a selling feature, specify trimmed backing, a cover patch, lining or a different decoration route.
7. Placement and hoop access can be stricter than a print area
Embroidery requires a frame/hoop and clearance for the machine. Seams, gussets, pockets, zippers, handles, rivets and thick reinforcements can obstruct access or prevent the panel from lying flat. A print platen also needs access, but a pre-assembly panel print can cover a broader region.
For a completed bag, define the centre of the visible face—not just the flat pattern piece. Keep the stitched mark away from folded edges and structural stitch boxes. If the decoration is embroidered before assembly, add a placement tolerance relative to the cut part and finished bag. The shopping-bag logo placement guide provides a broader panel map; add hoop/frame requirements for the embroidery route.
| Location | Embroidery question | Printing question | Approval reference |
|---|---|---|---|
| Front centre | Can the panel be framed without handle/seam interference? | Is the platen or pre-cut panel large enough? | Finished top/side/bottom measurements |
| Near top mouth | Will top turn or reinforcement create excess thickness? | Will the print enter a fold or closure zone? | Opened and closed bag view |
| Embroider pocket before attachment or through all layers? | Print pocket panel before sewing? | Pocket operation sequence | |
| Side gusset | Is there enough flat access and structural support? | Can artwork be printed on a separate gusset panel? | Bag open and folded |
| Handle | Is webbing width and framing suitable for readable stitching? | Can narrow webbing accept the chosen ink/transfer? | Handle length, logo repeat and wear zone |
8. An embroidery file and a print file are different production assets
Send the factory clean vector artwork, colour references, target size and placement for both routes. For embroidery, the supplier should return a digitized sew file, stitch plan and sample; the native machine file is derived from the approved art and chosen machine format. For printing, the supplier should return the production proof, separations/layers and process-specific output plan.
| Specification item | Embroidery file/package | Printing file/package |
|---|---|---|
| Source artwork | Vector master, target size and allowed simplification | Vector/text source plus linked raster images at effective size |
| Colour | Named thread brand/range/code or approved physical thread | Pantone/spot/CMYK target, white layer and physical proof route |
| Production data | Stitch types, sequence, density, underlay, trims and colour changes | Separations, screens/plates/transfer/digital setup, trap and cure |
| Material control | Fabric lot, backing/topping and operation stage | Fabric lot, pretreatment, ink/transfer and curing condition |
| Placement | Frame/hoop feasibility and finished-bag coordinates | Printable area, bleed/safe zone and finished-bag coordinates |
| Golden reference | Signed sewn panel and converted bag | Signed print trial and converted bag |
9. Cost behaves differently: stitches versus print setup
Embroidery cost often rises with stitch count and machine time. Increasing a solid filled logo can add many stitches; adding colour changes can add stops, trims and handling. Printing cost depends on route. Screen printing may add a screen and setup for each colour. Transfer or digital pricing may respond more to printed area, ink coverage, white layer and throughput. Large runs can favour a print route with higher setup but faster repeat production.
MOQ is not determined by the decoration word alone. Bag material ordering, dye lot, sewing line, print or embroidery setup, artwork count, packing and shipment all matter. Request quantity by bag construction × body colour × artwork × decoration size × decoration route.
| Commercial variable | Embroidery impact | Printing impact | How to quote fairly |
|---|---|---|---|
| Logo size | Usually increases stitch count, backing and runtime | May increase screen/transfer area, ink and press time | Give exact finished width/height |
| Colour count | Thread changes, trims and head scheduling | Extra spot screens/plates; process/digital logic differs | Provide actual colour/layer plan |
| Coverage | Dense fill adds significant machine time and stiffness | Full-area print may be practical on pre-printed panels/web | Separate local and all-over options |
| Artwork count | Separate digitizing and setup for each design | Separate prepress/tool or digital file change | Quantity by artwork, not only total units |
| Bag assembly | Pre-assembly access may add panel sorting and positioning | Panel printing may integrate more easily with cutting | Name decoration stage in routing |
| Reorder | Digitized file can be reused if size/material/route remain controlled | Tool ownership/storage or digital file control matters | Separate reusable setup from unit price |
10. Durability is a system result, not an automatic win
Embroidery is often perceived as durable, but poor thread, insufficient backing, weak tension, abrasive placement or unsecured ends can fail. Printing can also be durable when the ink or transfer is compatible and properly cured; the wrong chemistry, cure or heat can crack, peel, wash or migrate. Compare the intended bag life and care rather than assuming one decoration always lasts longer.
Avient’s textile ink curing guidance identifies stretch, crock/rub and wash as practical checks for cure, while noting that fabric and ink properties affect interpretation. Use the ink supplier’s instructions and a project-specific test plan. For embroidery, include thread security, abrasion, snagging, colour change and fabric distortion.
| QC item | Embroidery check | Printing check | Record |
|---|---|---|---|
| Appearance | Stitch coverage, gaps, outlines, tension, trims and thread shade | Colour, opacity, detail, registration and surface uniformity | Golden sample and viewing condition |
| Placement | Centre and rotation relative to finished panel | Centre, rotation, crop and printable boundary | Measurement points and tolerance |
| Fabric response | Puckering, needle damage, backing show and panel distortion | Scorch, shrinkage, migration, strike-through and hand | Before/after sample dimensions and photos |
| Mechanical durability | Abrasion, snag, loose thread and edge security | Dry/wet rub, flex, fold, scratch and adhesion | Method, cycles/load and result |
| Care / use | Thread/backing behaviour after intended cleaning | Colour/adhesion/cracking after intended cleaning | Care condition and acceptance rule |
| Reverse side | Backing trim, bobbin thread, knots and snag risk | Ink penetration, transfer outline or liner interaction | Inside photo/reference |
Connect decoration checks to the shopping-bag QC checklist. A precise logo does not compensate for weak handles, wrong capacity, uneven seams or poor carton protection.
11. A hybrid decoration can solve the “premium plus detail” brief
A common hybrid is a printed illustration with a small embroidered wordmark or crest. Printing carries colour complexity and coverage; embroidery creates the focal texture. Another option is appliqué: a fabric shape covers a large area while embroidery secures and outlines it, reducing dense fill stitches.
Operation order is critical. Printing heat or curing after embroidery may affect thread, backing or dimensional stability. Embroidery after printing can puncture the print and must not land on thick, brittle or raised areas. Ask for a routing sheet that states print, cure/transfer, conditioning, embroidery, construction and finishing sequence.
Keep enough distance between the two processes to accommodate placement tolerance, or deliberately overlap only after a registered sample proves it. A visual mock-up cannot establish this tolerance.
12.Use embroidery for local texture and printing for broad stories
A one-colour emblem on a contrast canvas tote can justify embroidery even at a modest size. A seasonal illustration, photographic campaign or repeating pattern is usually better printed. The full-surface graphics guide explains panel mapping and pre-conversion printing for large-area designs.
Do not use embroidery simply because it sounds premium. A dense rectangle can make a soft bag stiff, heavy and puckered. Do not use printing simply because it is familiar. A restrained embroidered monogram may communicate more value than a larger flat mark. The product, audience and price architecture should decide.
13. Sample in stages and freeze both decoration and bag construction
Begin with an artwork feasibility review on the nominated fabric. For embroidery, approve a sewn swatch or panel with the correct thread, backing and density. For printing, approve a strike-off or transfer/print sample with the correct ink system and colour reference. Then convert the approved decorated panel into a complete bag.
The complete bag reveals handle obstruction, panel distortion, lining appearance and how the logo sits when the bag is filled. Use the shopping-bag sample development process to control revisions. Any change to fabric weight, coating, artwork size, decoration route, placement or bag structure should trigger a defined reapproval.
| Approval gate | Embroidery evidence | Printing evidence | Release decision |
|---|---|---|---|
| Artwork review | Simplification, stitch logic and thread plan | Resolution, separations, white and process plan | Authorize sample data |
| Fabric trial | Sewn panel with actual backing/topping | Printed panel/strike-off with actual fabric | Approve material-decoration compatibility |
| Converted sample | Placement, puckering, interior and construction interaction | Placement, hand, colour and construction interaction | Sign golden bag |
| Pre-production | Digitized file revision, machine/thread/backing setup | Production file/tool/ink/transfer and cure setup | Release first-off |
| Bulk first-off | Actual line output against golden bag | Actual line output against golden bag | Start run with in-process frequency |
14. Avoid unsupported environmental claims
Neither embroidery nor printing is automatically “eco-friendly.” Compare thread fibre and dyeing, backing, ink/transfer chemistry, energy/cure, waste from setup, decoration durability, bag reusability and end-of-life implications. A permanent backing or transfer layer changes the product stack. A large decoration that survives use may be preferable to a lighter process that fails early, but the claim must match evidence.
Ask for material composition and process information relevant to the intended market. Keep decorative claims separate from verified fibre-content or recycled-content claims. If certification or chemical testing is required, state the product, scope, method, edition, laboratory and acceptance criteria in the RFQ.
Company-claim boundary: LUCKYSTAR statements in this section are publisher self-description, not third-party verification, Madeira/Avient authorization, embroidery or print certification, laboratory result or assurance of a particular stitch result, print result, durability, MOQ, price, environmental claim or delivery date. Confirm the contracting entity, assigned bag and decoration sites, subcontracting, exact fabric/construction, embroidery or print route, files, materials, samples, tests, inspection, packing and release terms for the order.
15. How LUCKYSTAR describes its decoration review
LUCKYSTAR states that its project team can compare embroidery, printing and hybrid decoration around one locked fabric shopping-bag specification, subject to specification and written confirmation.
- Lock the bag and access: record fabric composition/weight/finish, lining/pocket/closure, seams, handles/reinforcement, decoration stage and whether the panel or finished bag can be hooped, framed or printed flat.
- Translate the artwork: return embroidery simplification, digitized size/stitch/thread plan and backing, or print separations, white/base, ink/transfer, cure and route-specific minimum detail.
- Control placement: define view, origin, nominal coordinates, clearances, decoration width/height, orientation and achievable tolerance for each bag size and construction.
- Approve both faces: inspect front appearance plus reverse-side backing, bobbin/thread, penetrations, lining contact, stiffness and any finishing or cover layer.
- Test the system: define dimensional stability/puckering, thread security, abrasion, snag/flex/care, or ink adhesion/cure/rub/flex/migration as relevant, plus complete-bag loading and handling.
- Compare programme cost: separate digitizing or prepress, stitch count/thread changes/backing/hooping, print tools/white/ink/cure, samples, quantity by artwork, hybrid handling, pack-out and reorder controls.
Review the public fabric shopping bag options, the logo-placement guide and the print-route overview. Then send the bag specification, artwork, decoration size and quantity-by-design matrix for a route-specific proposal.
16. Send a decoration-ready RFQ
| Brief category | Information to send | Factory deliverable |
|---|---|---|
| Bag construction | Material/weight, colour, size, gusset, lining, handles, pocket, closure and intended load | Decoration-compatible construction and access review |
| Artwork | Vector master, target width/height, colour reference, minimum readable detail and allowed simplification | Embroidery, printing or hybrid recommendation |
| Placement | Finished-bag coordinates, sides/panels and critical clearances | Hoop/print-area feasibility and tolerance |
| SKU matrix | Units by construction, body shade, artwork, decoration size, route and destination | MOQ, setup/changeover and unit-cost alternatives |
| Quality | Appearance, placement, backing/interior, rub/abrasion, cleaning and colour requirements | Sample and inspection plan with references |
| Commercial | Deadline, packing, reorder horizon, tool/file ownership and trade term | Itemized setup, sample, unit, packing and schedule |
Frequently asked questions
Is embroidery better than printing for canvas shopping bags?
It is better for some compact logos and tactile premium effects. Printing is better for large graphics, fine detail, gradients or many colours. Canvas weight, weave, artwork and quantity decide the route.
Does embroidery last longer than printing?
Not automatically. Properly digitized embroidery with compatible thread and backing can be durable; properly selected and cured printing can also be durable. Test the real material under intended use and care.
Can a detailed logo be embroidered?
It may require enlargement, simplification, changed stitch types or removal of very small details. Approve a sewn sample at the final size before bulk production.
Why does embroidery need backing?
Backing stabilizes the fabric during stitching and helps control movement, puckering and distortion. Type and weight depend on fabric stability, design density, size and desired reverse-side appearance.
Can embroidery be added to a finished shopping bag?
Sometimes, if the machine can frame and access the location without seams, handles or reinforcements interfering. Pre-assembly panel embroidery often provides better access and a cleaner lined interior.
Which method is better for small text?
Printing generally retains smaller text more easily. Embroidery needs sufficient letter stroke, opening and spacing for the chosen thread, fabric and size. Sew a test rather than relying on a universal minimum.
Which method is cheaper?
It depends on artwork and quantity. Small open embroidery can be competitive, while dense large embroidery adds machine time. Simple screen printing and complex digital/transfer routes have different setup and unit economics.
Can embroidery and printing be combined?
Yes. A printed field with a small stitched logo is a useful premium combination. The supplier must confirm operation order, placement tolerance and compatibility between heat, ink, thread and backing.
Can Pantone colours be matched in embroidery?
Thread is selected from a physical colour range, and its sheen changes appearance. Use a nominated thread code and sewn approval; do not assume a printed Pantone reference will look identical in thread.
What should be approved before production?
Approve the actual fabric, bag construction, decoration file, thread or print colour, backing/ink system, finished size and placement, reverse side, converted sample and bulk first-off.
Conclusion
Embroidered Shopping Bags are strongest when a compact mark should feel tactile, crafted and durable-looking. Printed Fabric Shopping Bags are stronger for broad coverage, fine detail, gradients and colour-rich campaigns. The best route is the one that translates the artwork cleanly onto the chosen fabric without compromising bag function, cost or repeatability.
Compare LUCKYSTAR’s fabric shopping bag options. The Shopping Bags sourcing pillar supports category decisions, while the main manufacturer guide helps evaluate broader custom-bag capability.

Send LUCKYSTAR your fabric, bag dimensions, artwork, decoration size, quantity by design and required tests for an embroidery-versus-printing recommendation.
Request a comparable decoration proposal
Use one fabric bag specification, artwork package and quantity-by-design matrix so embroidery, printing and hybrid assumptions can be compared.
Review LUCKYSTAR custom shopping bag options, then send your project details through the contact form or Email a project brief. The email link opens a draft for your review before sending.
Site assignment, fabric/construction, embroidery or print system, materials, equipment, tools/files, samples, performance, inspection, price, MOQ, packing, schedule and release terms are subject to due diligence, specification and written confirmation.