Last reviewed: September 28, 2026
What Makes a Custom Makeup Pouch Different
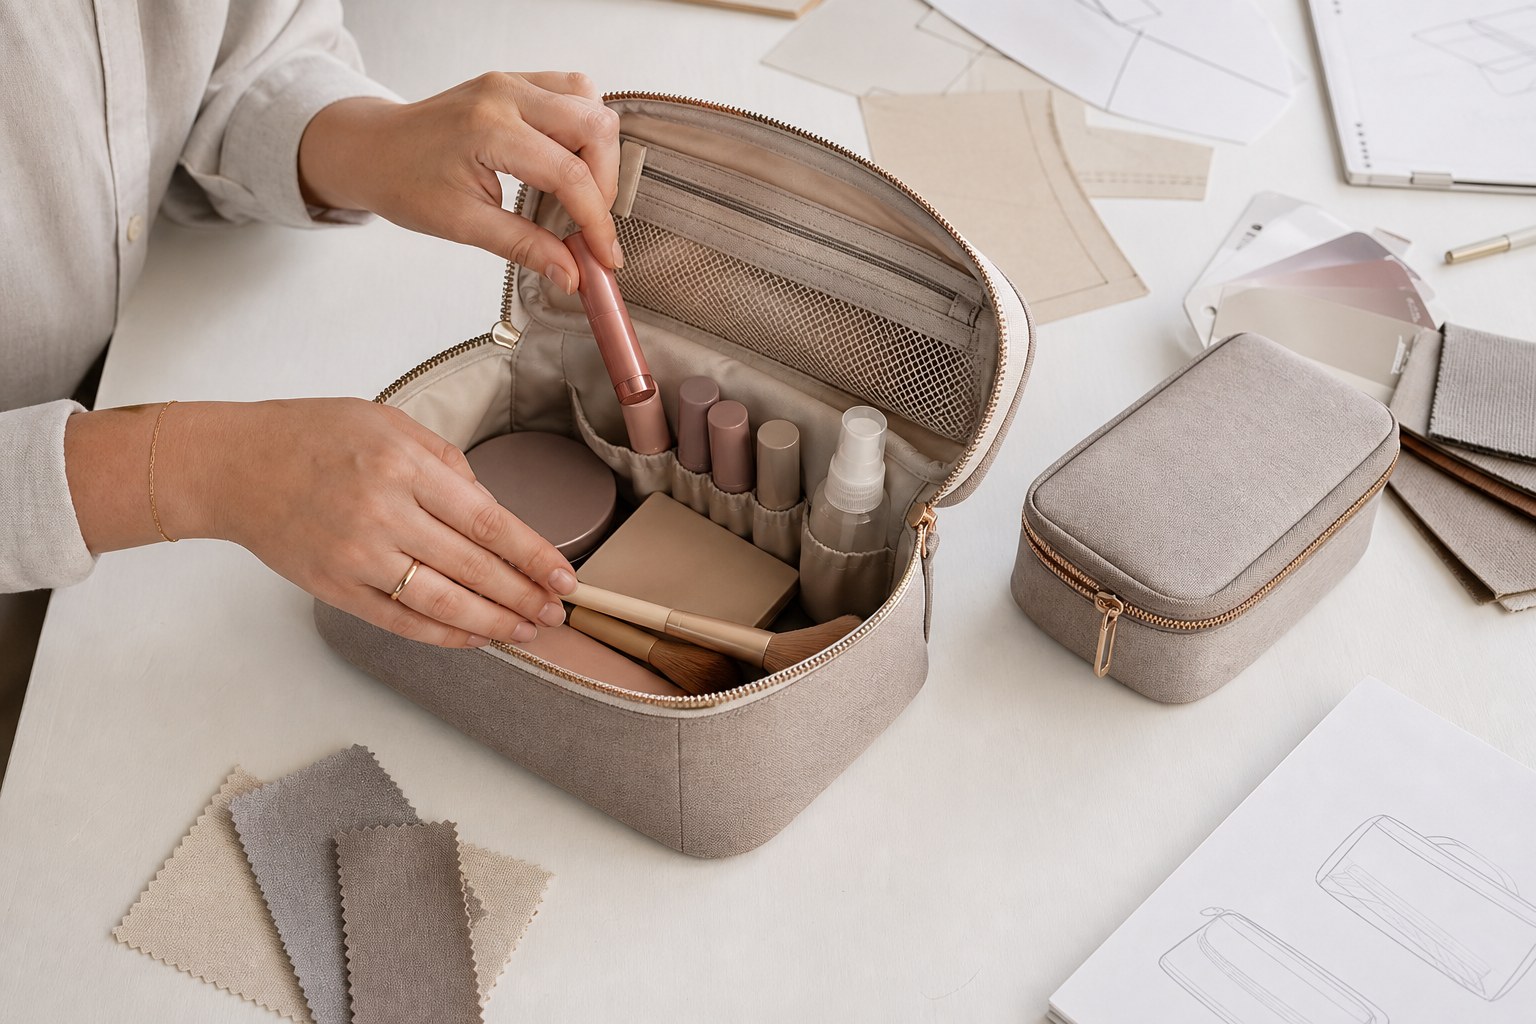
A generic pouch holds objects. A custom makeup pouch supports a defined set of products, a context and a sequence of actions. It may live inside a handbag, open on a small hotel counter, travel in checked luggage, support a professional kit or arrive as part of a beauty set. Each context creates different friction.
The user does not experience a bill of materials. The user experiences whether the pouch stands or collapses, whether a compact hides under bottles, whether a brush catches in the zipper, whether the interior reveals residue and whether the bag closes after the routine. The design brief should translate those moments into observable requirements.
Begin With the Routine, Not the Bag Shape
Write a short scenario before selecting a silhouette. Identify the user, location, products, frequency and available surface. A commuter touching up makeup in a restroom needs a different access path from a traveler unpacking skincare at a hotel. A gift-with-purchase pouch may carry a fixed product set once, while a retail pouch must support changing contents over time.
Do not use labels such as small, travel or premium as substitutes for the scenario. Record the real products or representative objects and the order in which they are normally used.
Map the Complete User Journey
A useful map begins before the zipper opens and ends after the pouch is put away. Observe how it is carried, found, placed, opened, searched, used, reloaded, closed, cleaned and stored. A problem near the end can invalidate an attractive beginning. For example, a wide opening may improve visibility but spill contents if the pouch has no stable base.
| Journey step | Question to observe | Possible design response | Sample evidence |
|---|---|---|---|
| Carry | Where does the pouch travel and what presses against it? | Soft profile, structured wall, handle or protected product zone | Loaded carry and compression check |
| Place | How much clean surface is available? | Stable base, hanging route, compact footprint or flat-open format | Real counter or shelf simulation |
| Open | Can the user operate the closure with the pouch loaded? | Opening path, pull grip, restraint panel or double-slider route | Repeated loaded open-close sequence |
| Find | Can the needed item be seen without emptying the bag? | Light interior, wide view, mesh zone or shallow category pocket | Timed retrieval from a representative load |
| Use | Where do removed items rest during the routine? | Fold-out panel, stable open posture or removable small pouch | Complete routine walkthrough |
| Return | Can items go back without a careful repacking puzzle? | Clear home zones, elastic control or flexible reserve space | Close test after normal, not perfect, repacking |
| Clean | Can corners, pockets and residue zones be reached? | Accessible lining, removable part or fewer debris traps | Stain, wipe and dry review for the approved material route |
Choose the Primary Access Pattern
Access pattern determines how the user sees and reaches the contents. A top zipper is compact but can create a deep search zone. A zip-around opening exposes more of the interior but needs controlled hinges or side panels. A drawstring can reveal the whole load quickly but offers little internal restraint. A roll-up or hanging format creates vertical zones but requires setup space.
Choose one primary behavior. Adding every opening idea to one pouch can increase sewing complexity without improving the routine. The detailed component specification belongs in the zipper and hardware guide; here, the buyer's decision is what access behavior the closure must create.
Design Visibility Before Adding More Pockets
Users often dig because the opening, depth and interior contrast hide the contents. More pockets do not automatically solve that problem. A pocket can become another place where a product disappears. Start with the line of sight from the open position: can the user see the base, the tall-item zone and the small-item zone?
Visibility can come from a wider opening, a shallower body, a light or contrasting interior, mesh, clear panels or tiered placement. Select the method that fits the scenario and privacy needs. A clear panel is useful only when the visible contents are appropriate for the channel.
Organize by Action, Not Only by Product Category
Sorting makeup, skincare and tools sounds logical, but the real routine may use one item from each category in sequence. Observe which items are reached together, which can share space and which should stay controlled. A touch-up pouch may group lipstick, compact and concealer in one fast-access zone. A travel kit may separate items used at the sink from products used at the mirror.
This action-based view reduces unnecessary compartments. It also makes the product easier to reload because the user remembers the sequence rather than an abstract category system.
Separate Brushes, Sponges and Residue-Prone Items
Brush heads and used sponges can collect cosmetic residue and transfer it to other contents. A dedicated sleeve, flap, removable mini pouch or covered tool zone can keep that residue more localized. The zone should not crush bristles or force long handles across the zipper path.
A barrier is useful only if the user can access and clean it. Avoid narrow blind pockets that cannot be turned, wiped or inspected. Consumer cleaning guidance commonly recommends protecting brushes and sponges rather than leaving them loose with the main products; the buyer's task is to turn that behavior into a practical, manufacturable zone.
Create Homes Without Removing Flexibility
Highly fitted loops look organized in a sample but may reject a slightly wider tube or a new product format. Fully open space accepts change but can become a pile. Use fitted control for objects whose dimensions are stable, and flexible zones for contents likely to change.
Elastic loops, mesh pockets, dividers and removable pouches each consume space and add construction. The size and capacity guide explains how those features reduce usable volume. In the journey brief, specify which item needs a home and what failure that home prevents.
| Feature | User problem it can solve | Trade-off | Validation question |
|---|---|---|---|
| Elastic loop | Controls a stable tube or brush handle | May be too tight, loose or size-specific | Does it hold the smallest and largest approved item? |
| Mesh pocket | Shows contents while restraining loose items | Can snag tips or collect residue at the binding | Can the user see, remove and clean the contents? |
| Opaque zip pocket | Contains private or small items | Hides contents and adds another closure | Is the pocket shallow enough to search? |
| Removable pouch | Separates tools, liquids or a quick-use set | Adds parts and can be misplaced | Is removal useful in the real routine? |
| Fixed divider | Prevents tall products from falling across the bag | Reduces adaptability | Does the approved load still fit after a product change? |
| Open reserve zone | Accepts changing products and irregular shapes | Offers less restraint | Can the bag close after normal movement? |
Use the Surface Context as a Design Input
A pouch may open on a narrow sink ledge, a hotel shelf, a retail counter or a user's lap. Record the available footprint and whether hanging is realistic. A bag that needs a large clean surface may fail for a traveler even when its internal organization is excellent.
Test the open pouch on the smallest credible surface. Check whether it tips, whether products roll out, whether the lid stays open and whether water from the surrounding environment reaches absorbent areas. Do not make a waterproof claim from this observation; it is a layout and handling test.
Design for Normal Repacking, Not a Perfect Display
Sample photos are usually packed carefully. Real users return products quickly, change the order and add temporary items. Leave a controlled amount of flexibility so the pouch can close without exact placement. If every item must face one direction, the design behaves like a display case rather than an everyday pouch.
Run the closing test after a complete routine. Ask the user to repack naturally without coaching, then inspect zipper strain, bulging, item collision and unused pockets.
Make Residue Visible and Recoverable
Cosmetic residue is a predictable use condition. Interior color, surface texture, seams and corners affect whether residue is noticed and whether it can be removed. A very dark lining can hide marks but also hide small products. A very light lining improves visibility but may show staining more clearly.
Choose the balance according to the brand promise and cleaning route. The dedicated lining guide covers material systems, construction and care instructions. This user-journey page defines where residue is likely to appear and which areas must remain reachable.
Translate the Journey Into a Design Brief
A factory cannot quote "easy to use" or "well organized" consistently. Convert each goal into a product interaction and a check. State the representative product set, open posture, retrieval priorities, controlled zones, surface context, cleaning access and closing behavior. Attach photographs or a simple product map when useful.
Once those decisions are stable, transfer dimensions, materials, construction and artwork to the cosmetic bag tech pack. The journey brief explains why a feature exists; the tech pack explains how the approved feature is made.
Build a Loaded Sample Test
An empty pouch can appear spacious, stable and easy to close. Test the real or representative load. Use the heaviest credible combination, the smallest item that could disappear, the longest tool, the widest compact and any product that may leak or leave residue. The sample development guide explains sample stages; this test focuses on the user's complete interaction.
| Test | Method | Pass evidence | Decision if it fails |
|---|---|---|---|
| Open and view | Place the loaded pouch in the intended context and open it normally | Priority items and main zones are visible | Change opening, depth, contrast or placement |
| Retrieve | Remove high-priority and smallest items without emptying the bag | Access does not disturb unrelated contents | Revise zone depth, pocket or restraint |
| Routine sequence | Use representative items in their natural order | The pouch remains stable and supports the sequence | Change posture, footprint or action grouping |
| Natural return | Reload without coaching or perfect arrangement | All approved items return and the pouch closes | Add flexible space or remove unnecessary fittings |
| Residue access | Apply an approved test soil to likely contact areas and follow the cleaning route | Target areas can be reached and reviewed after drying | Revise material, seam access or care route |
| Loaded carry | Carry and place the pouch as the user would | Contents stay controlled and vulnerable items remain protected | Revise restraint, structure or product allocation |
Use Failure Evidence to Revise One Variable at a Time
If retrieval is slow, do not redesign the entire pouch immediately. Identify whether the cause is opening width, depth, visibility, pocket placement or product interference. Change one variable, repeat the same loaded test and record the result. This creates a defensible approval trail and reduces accidental trade-offs.
For performance checks beyond the user sequence, use the custom cosmetic bag testing guide. For workmanship inspection in bulk, use the cosmetic bag QC checklist.
Keep Brand Expression Connected to Use
Color, logo, lining contrast, puller shape and packaging can express the brand, but they should not block the routine. A large decoration may sit on a fold, a custom puller may be hard to grip, or a very dark interior may reduce visibility. Review brand elements while the pouch is open, loaded and handled, not only in a flat rendering.
For portfolio-level visual rules, use the cosmetic bag collection guide. For market positioning and logo routes, see the custom logo makeup bag guide.
Match the Journey to the Commercial Channel
A retail customer chooses the pouch and may compare its organization with alternatives. A promotional recipient may value immediate simplicity and a clear relationship to the gift set. A subscription program must pack efficiently and arrive in a consistent condition. Use the retail versus promotional guide for the commercial decision and the beauty packaging guide when products are packed inside the pouch.
Warning Signs in a Makeup Pouch Concept
- The design begins with a mood board but no representative product set.
- Every available pocket type is added without a user problem.
- The opening looks wide when empty but closes around the loaded contents.
- Brushes cross the zipper path or sit against residue-prone products.
- The pouch can be packed only in one perfect arrangement.
- Interior corners or pockets cannot be reached for cleaning review.
- The sample is approved from photographs without a complete routine test.
- Brand decoration reduces grip, visibility or opening behavior.
How Luckystar Supports User-Journey Development
Luckystar can review the intended user, product set, carry context, open posture, organization logic, artwork, quantity, packaging and target date. A useful first review separates required interactions from optional features, so the sample route tests the most important assumptions first.
Buyers planning a broader supply relationship can start with the core Custom Bag Manufacturer pillar. Teams ready to compare factories can use the guide to choosing a cosmetic bag manufacturer. If the product is already approved and the question is quantity and replenishment, use the bulk cosmetic bag planning guide.
Information to Send for a Custom Makeup Pouch Review
- Target user, channel and primary use situation.
- Representative products with dimensions, weight and use order.
- Required open posture and available counter, shelf or hanging space.
- Priority retrieval items and contents that need separation.
- Expected cleaning behavior and residue-prone zones.
- Reference shape, artwork, quantity, packaging and target in-hand date.
- Existing sample feedback, including what was difficult to see, reach or return.
Send the representative product set, routine, desired structure, artwork, quantity and delivery target. Luckystar can review the information needed for a sample and quotation route.
Email a prefilled makeup pouch user-journey brief

Frequently Asked Questions
What should I decide before choosing the pouch shape?
Define the user, location, representative products, use sequence, available surface and cleaning behavior. The silhouette should support those inputs rather than force the routine into a fashionable shape.
Does a custom makeup pouch need many compartments?
No. Add a compartment only when it improves visibility, retrieval, separation or control. Too many fitted zones can waste space and reduce adaptability when products change.
How should brushes be stored inside a makeup pouch?
Keep brush heads from being crushed or rubbing loose residue across other products. Test a covered sleeve, flap, removable pouch or appropriately sized loop with the actual brush range.
How do I test whether the pouch is easy to use?
Load it with representative items and complete the real sequence: carry, place, open, find, use, return, close and clean. Observe where users hesitate, remove unrelated items or repack carefully.
Can one pouch work for daily carry and travel?
It can if the product sets and surface contexts are similar, but validate both loads. A daily pouch may prioritize compact access, while travel use may require more capacity, separation and shape protection.
Design the Routine Before Approving the Product
Review the current custom cosmetic bag range to choose a practical starting format for the routine and representative load. A strong custom makeup pouch is not defined by the number of pockets or the size of its logo. It succeeds when users can see the right items, reach them in a natural sequence, keep residue-prone contents controlled, use the pouch on the available surface and put everything away without a puzzle. Map that journey, translate it into observable requirements and approve the loaded interaction before bulk production.